⦁ 프로세스와 쓰레드(process & thread)
▶ 프로세스 : 실행중인 프로그램, 자원(resources)과 쓰레드로 구성
▶ 쓰레드 : 프로세스 내에서 실제 작업을 수행.
모든 프로세스는 최소한 하나의 쓰레드를 가지고 있다.
프로세스 : 쓰레드 = 공장 : 일꾼
싱글 쓰레드 프로세스 = 자원 + 쓰레드
멀티 쓰레드 프로세스 = 자원 + 쓰레드 + 쓰레드 + 쓰레드 +...+쓰레드
=> 하나의 새로운 프로세스를 생성하는 것 보다 하나의 새로운 쓰레드를 생성하는 것이 더 적은 비용이 든다.
⦁ 멀티쓰레드의 장단점
장점)
- 시스템 자원을 보다 효율적으로 사용할 수 있다.
- 사용자에 대한 응답성(responseness)이 향상된다.
- 작업이 분리되어 코드가 간결해진다.
단점)
- 동기화(synchronization)에 주의해야 한다.
- 교착상태(dead-lock)가 발생하지 않도록 주의해야 한다.
- 각 쓰레드가 효율적으로 고르게 실행될 수 있게 해야 한다.
=> 프로그래밍을 할 때 고려해야할 사항들이 많다.
⦁ 쓰레드의 구현과 실행
① Thread클래스를 상속
class MyThread extends Thread {
	public void run() { // Thread 클래스의 run()을 오버라이딩
	/* 작업내용 */
	}
}
MyThread t1 = new MyThread(); // 쓰레드의 생성
t1.start(); // 쓰레드의 실행② Runnable 인터페이스를 구현
class MyThread2 implements Runnable {
	public void run() { // Runnable인터페이스의 추상메소드 run()을 구현
		/* 작업내용 */
	}
}
(Runnable 인터페이스)
public interface Runnable {
	public abstract void run();
}
=> run 메소드를 구현하면 됨
Runnable r = new MyThread2();
Thread t2 = new Thread(r); // Thread(Runnable r)
// Thread t2 = new Thread(new MyThread2());
t2.start();
⦁ 쓰레드의 실행 – start()
- 쓰레드를 생성한 후에 start()를 호출해야 쓰레드가 작업을 시작한다.
ThreadEx1_1 t1 = new ThreadEx1_1();	// 쓰레드 t1을 생성한다.
ThreadEx1_1 t2 = new ThreadEx1_1();	// 쓰레드 t2를 생성한다.

t1.start();	// 쓰레드 t1을 실행시킨다.
t2.start();	// 쓰레드 t2를 실행시킨다.
start 했다고 즉시 실행되는 것이 아니고, 먼저 start했다고 먼저 실행되는 것이 아님.
(OS스케쥴러가 실행순서를 결정함)
⦁ start()와 run()
start 메소드가 새로운 호출스택을 생성하고 새롭게 생성된 호출스택에서 run 메소드를 실행하게 됨.

ex)
public class Ex13_1 {

	public static void main(String[] args) {
		ThreadEx1_1 t1 = new ThreadEx1_1();

		Runnable r = new ThreadEx1_2();
		Thread t2 = new Thread(r);

		t1.start();
		t2.start();

	}

}

class ThreadEx1_1 extends Thread {	// 1. Thread 클래스를 상속해서 쓰레드를 구현
	public void run() {
		for(int i=0; i<5; i++) {
			System.out.println(this.getName()); // 조상인 Thread의 getName()을 호출
		}
	}
}

class ThreadEx1_2 implements Runnable { // 2. Runnable 인터페이스를 구현해서 쓰레드를 구현
	public void run() {
		for(int i=0; i<5; i++) {
			// Thread.currentThread() - 현재 실행중인 Thread를 반환한다.
			System.out.println(Thread.currentThread().getName());
		}
	}
}
⦁ main쓰레드
- main메소드의 코드를 수행하는 쓰레드
- 쓰레드는 ‘사용자 쓰레드’와 ‘데몬 쓰레드(보조 쓰레드)’ 두 종류가 있다.
실행중인 사용자 쓰레드가 하나도 없을 때 프로그램은 종료된다.
ex)
public class Ex13_11 {
	static long startTime = 0;

	public static void main(String[] args) {
		ThreadEx11_1 th1 = new ThreadEx11_1();
		ThreadEx11_2 th2 = new ThreadEx11_2();
		th1.start();
		th2.start();
		startTime = System.currentTimeMillis();

		try {
			th1.join(); // main쓰레드가 th1의 작업이 끝날 때까지 기다린다.
			th2.join(); // main쓰레드가 th2의 작업이 끝날 때까지 기다린다.
		} catch (InterruptedException e) {}

		System.out.print("소요시간:" + (System.currentTimeMillis() - startTime));
	}

}

class ThreadEx11_1 extends Thread {
	public void run() {
		for(int i=0; i<300; i++) {
			System.out.print(new String("-"));

		}
	}

}

class ThreadEx11_2 extends Thread {
	public void run() {
		for (int i=0; i <300; i++) {
			System.out.print(new String("|"));
		}
	}
}
⦁ 싱글쓰레드와 멀티쓰레드
▶ 싱글쓰레드
public class Ex13_2 {

	public static void main(String[] args) {
		long startTime = System.currentTimeMillis();

		for(int i=0; i<300; i++)
			System.out.printf("%s", new String("-"));

		System.out.print("소요시간1:" + (System.currentTimeMillis() - startTime));

		for(int i=0; i<300; i++)
			System.out.printf("%s", new String("|"));

		System.out.print("소요시간2:" + (System.currentTimeMillis() - startTime));
	}

}
▶ 멀티쓰레드
class ThreadEx3_1 extends Thread {
	public void run() {
		for(int i=0; i<300; i++)
			System.out.printf("%s", new String("|"));

		System.out.print("소요시간2:" + (System.currentTimeMillis() - Ex13_3.startTime));
	}
}
public class Ex13_3 {
	static long startTime = 0;

	public static void main(String[] args) {
		ThreadEx3_1 th1 = new ThreadEx3_1();
		th1.start();
		startTime = System.currentTimeMillis();

		for(int i=0; i<300; i++)
			System.out.printf("%s", new String("-"));

		System.out.print("소요시간1:" + (System.currentTimeMillis()-Ex13_3.startTime));
	}

}
⦁ 쓰레드의 I/O 블락킹(blocking) - 입출력시 작업중단
import javax.swing.JOptionPane;

public class Practice {

	public static void main(String[] args) {
		String input = JOptionPane.showInputDialog("아무 값이나 입력하세요.");
		System.out.println("입력하신 값은 "+input+"입니다.");

		for(int i=10; i>0; i--) {
			System.out.println(i);
			try { Thread.sleep(1000); } catch (Exception e) {} // 1초 간 시간을 지연한다.
		}

	}

}(싱글쓰레드는 사용자로부터 입력을 기다리는 동안 아무 일도 하지 않는다)
import javax.swing.JOptionPane;

class ThreadA extends Thread {
	public void run() {
		for(int i=10; i>0; i--) {
			System.out.println(i);
			try { Thread.sleep(1000); } catch (Exception e) {} // 1초 간 시간을 지연한다.
		}
	}
}

public class Practice {

	public static void main(String[] args) {
		ThreadA th1 = new ThreadA();
		th1.start();

		String input = JOptionPane.showInputDialog("아무 값이나 입력하세요.");
		System.out.println("입력하신 값은 "+input+"입니다.");


	}

}
(멀티쓰레드는 사용자로부터 입력을 기다리는 동안 th1을 수행한다)
⦁ 쓰레드의 우선순위(priority of thread)
- 작업의 중요도에 따라 쓰레드의 우선순위를 다르게 하여 특정 쓰레드가 더 많은 작업시간을 갖게 할 수 있다.
void setPriority(int newPriority)	 // 쓰레드의 우선순위를 지정한 값으로 변경한다.
int getPriority()	 // 쓰레드의 우선순위를 반환한다.
우선순위는 1~10까지 있으며, 따로 우선순위를 정해주지 않으면 기본적으로 보통우선순위인 5로 지정된다.
(하지만 어디까지나 희망사항이고, 정확하게는 OS스케쥴러에 의해 조절이 된다)
ex)
class ThreadEx6_1 extends Thread {
	public void run() {
		for (int i=0; i<300; i++) {
			System.out.print("-");
			for(int x=0; x<10000000; x++);	// 시간지연용 for문
		}
	}
}

class ThreadEx6_2 extends Thread {
	public void run() {
		for(int i=0; i<300; i++) {
			System.out.print("|");
			for(int x=0; x<10000000; x++);	// 시간지연용 for문
		}
	}
}
public class Ex13_6 {

	public static void main(String[] args) {
		ThreadEx6_1 th1 = new ThreadEx6_1();
		ThreadEx6_2 th2 = new ThreadEx6_2();

		th2.setPriority(7);

		System.out.println("Priority of th1(-) : " + th1.getPriority()); // 기본 5
		System.out.println("Priority of th2(|) : " + th2.getPriority());
		th1.start();
		th2.start();
	}

}
⦁ 쓰레드 그룹
- 서로 관련된 쓰레드를 그룹으로 묶어서 다루기 위한 것
- 모든 쓰레드는 반드시 하나의 쓰레드 그룹에 포함되어 있어야 한다.
- 쓰레드 그룹을 지정하지 않고 생성한 쓰레드는 ‘main쓰레드 그룹’에 속한다.
- 자신을 생성한 쓰레드(부모 쓰레드)의 그룹과 우선순위를 상속받는다.
Thread의 생성자)
Thread(ThreadGroup group, String name)
Thread(ThreadGroup group, Runnable target)
Thread(ThreadGroup group, Runnable target, String name)
Thread(ThreadGroup group, Runnable target, String name, longstackSize)
ThreadGroup getThreadGroup() // 쓰레드 자신이 속한 쓰레드 그룹을 반환한다.
void uncaughtException(Thread t, Throwable e)
// 처리되지 않은 예외에 의해 쓰레드그룹의 쓰레드가 실행이 종료되었을 때,
// JVM에 의해 이 메소드가 자동적으로 호출된다.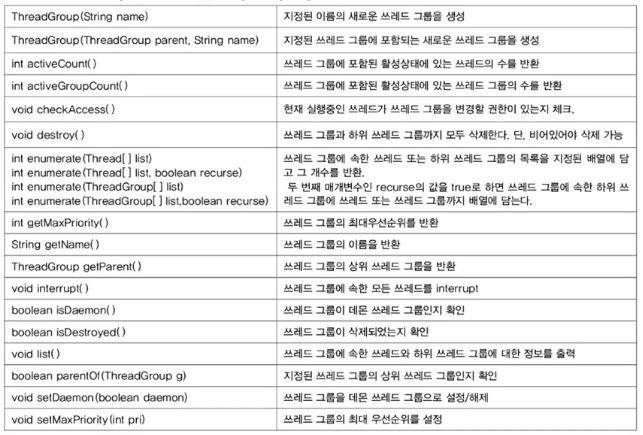
(쓰레드들은 기본적으로 쓰레드 그룹으로 묶어서 다룬다)
⦁ 데몬 쓰레드(daemon thread)
- 일반 쓰레드(non-daemon thread)의 작업을 돕는 보조적인 역할을 수행.
- 일반 쓰레드가 모두 종료되면 자동적으로 종료된다.
- 가비지 컬렉터, 자동저장, 화면 자동갱신 등에 사용된다.
- 무한루프와 조건문을 이용해서 실행 후 대기하다가 특정조건이 만족되면 작업을 수행하고 다시 대기하도록 작성한다.
boolean isDaemon()  // 쓰레드가 데몬 쓰레드인지 확인한다. 데몬 쓰레드이면 true를 반환
void setDaemon(boolean on) // 쓰레드를 데몬 쓰레드로 또는 사용자 쓰레드로 변경
						   //매개변수 on을 true로 지정되면 데몬 쓰레드가 된다.
* setDaemon(boolean on)은 반드시 start()를 호출하기 전에 실행되어야 한다.
그렇지 않으면 IllegalThreadStateException이 발생한다.
ex)
public class Ex13_7 implements Runnable {

	static boolean autoSave = false;

	public void run() {
		while(true) {
			try {
				Thread.sleep(3*1000); // 3초마다
			} catch (InterruptedException e) {}

			// autoSave의 값이 true이면 autoSave()를 호출한다.
			if (autoSave) autoSave();
		}
	}

	public void autoSave() {
		System.out.println("작업파일이 자동저장되었습니다.");
	}

	public static void main(String[] args) {
		Thread t = new Thread(new Ex13_7());
		t.setDaemon(true); // 이 부분이 없으면 종료되지 않는다.
		t.start();

		for(int i=1; i<=10; i++) {
			try {
				Thread.sleep(1000);
			} catch(InterruptedException e) {}

			System.out.println(i);

			if(i==5) autoSave = true;
		}

		System.out.println("프로그램을 종료합니다.");

	}

}
⦁ 쓰레드의 상태
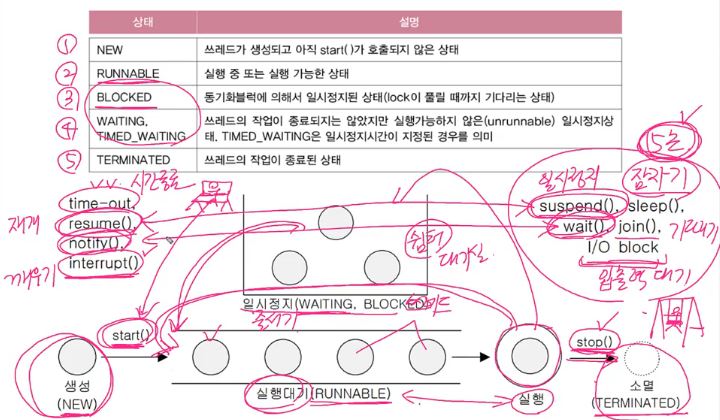
⦁ 쓰레드의 실행제어
- 쓰레드의 실행을 제어할 수 있는 메소드가 제공된다.
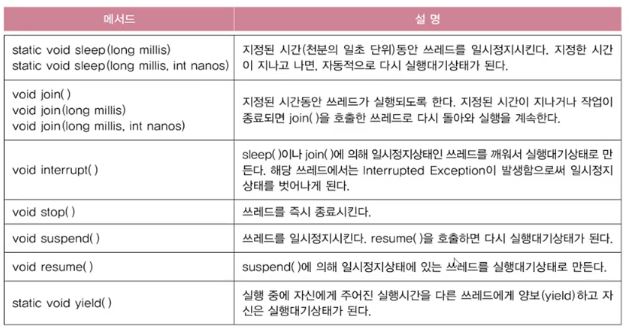
(sleep과 yield 메소드는 쓰레드 자기 자신에게만 호출 가능 – static 메소드)
⦁ sleep() - static 메소드
- 현재 쓰레드를 지정된 시간동안 멈추게 한다.
static void sleep(long millis)	// 천분의 일초 단위
static void sleep(long millis, int nanos) // 천분의 일초 + 나노초
- 예외처리를 해야 한다.(InterruptedException이 발생하면 깨어남)
try {
	Thread.sleep(1, 500000);		// 쓰레드를 0.0015초 동안 멈추게 한다.
} catch (InterruptedException e) {} // Exception의 자손. 필수로 예외처리 해야 함.
또는 예외처리가 된 메소드를 만들어서 활용한다.
void delay(long millis) {
	try {
		Thread.sleep(millis);
	} catch (InterruptedException e) {}
}
- 특정 쓰레드를 지정해서 멈추게 하는 것은 불가능하다.
try {
	Thread.sleep(2000);	// 자기 자신이 잠든다.
} catch(InterruptedException e) {}
ex)
class ThreadEx8_1 extends Thread {
	public void run() {
		for (int i=0; i<300; i++) System.out.print("-");
		System.out.print("<<th1 종료>>");
	}
}

class ThreadEx8_2 extends Thread {
	public void run() {
		for (int i=0; i<300; i++) System.out.print("|");
		System.out.print("<<th2 종료>>");
	}
}
public class Ex13_8 {

	static void delay(long millis) {
		try {
			Thread.sleep(millis);	// 메인쓰레드를 2초동안 잠들게 함
		} catch(InterruptedException e) {}
	}

	public static void main(String[] args) {
		ThreadEx8_1 th1 = new ThreadEx8_1();
		ThreadEx8_2 th2 = new ThreadEx8_2();
		th1.start();
		th2.start();

		delay(2*1000);

		System.out.print("<<main 종료>>");
	}

}
⦁ interrupt()
- 대기상태(WAITING)인 쓰레드를 실행대기 상태(RUNNABLE)로 만든다.
void interrupt()	 // 쓰레드의 interrupted상태를 false에서 true로 변경
boolean isInterrupted()	// 쓰레드의 interrupted상태를 반환
static boolean interrupted() // 현재 쓰레드의 interrupted상태를 알려주고, false로 초기화.
* interrupted()는 static 메소드이고 자기 자신 쓰레드의 interrupted 상태를 알려주는것임.
public static void main (String[] args) {
	ThreadEx13_2 th1 = new ThreadEx13_2();
	th1.start();
	...
	th1.interrupt(); 	// interrupt()를 호출하면, interrupted상태가 true가 된다.
	...
	System.out.println("isInterrupted():" + th1.isInterrupted()); // true
}
ex)
import javax.swing.JOptionPane;

class ThreadEx9_1 extends Thread {
	public void run() {
		int i = 10;

		while(i!=0 && !isInterrupted()) {
			System.out.println(i--);
			for(long x=0; x<250000000000000000L; x++); // 시간지연용
		}

		System.out.println("isInterrupted():"+this.isInterrupted()); // true
		System.out.println("isInterrupted():"+this.isInterrupted()); // true

		// insInterrupted()와 달리 interrupted()는 interrupted라는 상태변수를 false로 초기화한다.
		System.out.println("interrupted():"+Thread.interrupted()); // true
		System.out.println("interrupted():"+Thread.interrupted()); // false

		System.out.println("카운트가 종료되었습니다.");
	}
}
public class Ex13_9 {

	public static void main(String[] args) {
		ThreadEx9_1 th1 = new ThreadEx9_1();
		th1.start();

		String input = JOptionPane.showInputDialog("아무 값이나 입력하세요.");
		System.out.println("입력하신 값은 "+input+"입니다.");
		th1.interrupt(); // interrupt()를 호출하면, interrupted상태가 true가 된다.
		System.out.println("isInterrupted():"+th1.isInterrupted()); // true
		System.out.println("isInterrupted():"+th1.isInterrupted()); // true

		// main쓰레드가 interrupt 되었는지 확인
		System.out.println(Thread.interrupted()); // false

	}

}
⦁ suspend(), resume(), stop()
- 쓰레드의 실행을 일시정지, 재개, 완전정지 시킨다.
void suspend()  // 쓰레드를 일시정지 시킨다.
void resume()  // suspend()에 의해 일시정지된 쓰레드를 실행대기상태로 만든다.
void stop()	// 쓰레드를 즉시 종료시킨다.
- suspend(), resume(), stop()은 교착상태에 빠지기 쉬워서 deprecated 되었다.
그래서 직접 메소드를 작성해서 사용하기도 한다.
class ThreadEx17_1 implements Runnable {
	boolean suspended = false;
	boolean stopped = false;

	public void run() {
		while(!stopped) {
			if(!suspended) {
				/* 쓰레드가 수행할 코드를 작성 */
			}
		}
	}
	public void suspend() { suspended = true; }
	public void resume() { suspended = false; }
	public void stop() { stopped = true; }
}
=> 이런식으로 suspend와 resume, stop 메소드를 직접 작성해서 쓴다.
ex) 기존의 suspend, resume, stop 메소드를 사용한 경우
class RunImplEx10 implements Runnable {
	public void run() {
		while(true) {
			System.out.println(Thread.currentThread().getName());
			try {
				Thread.sleep(1000);
			} catch(InterruptedException e) {}
		}
	}
}
public class Ex13_10 {

	public static void main(String[] args) {
		RunImplEx10 r = new RunImplEx10();
		Thread th1 = new Thread(r, "*");
		Thread th2 = new Thread(r, "**");
		Thread th3 = new Thread(r, "***");

		th1.start();
		th2.start();
		th3.start();

		try {
			Thread.sleep(2000);
			th1.suspend(); // 쓰레드 th1을 잠시 중단시킨다.
			Thread.sleep(2000);
			th2.suspend();
			Thread.sleep(3000);
			th1.resume();
			Thread.sleep(3000);
			th1.stop();
			th2.stop();
			Thread.sleep(2000);
			th3.stop();
		} catch (InterruptedException e) {}

	}

}
ex) 직접 작성한 suspended, resume, stop 메소드를 사용한 경우
class MyThread implements Runnable {
	volatile boolean suspended = false; // 쉽게 바뀌는 변수, cache의 복사본이 아닌 원본을 사용함.
	volatile boolean stopped = false;

	Thread th;

	MyThread(String name) {
		th = new Thread(this, name); // Thread(Runnable r, String name)
	}

	void start() {
		th.start();
	}

	void stop() {
		stopped = true;
	}

	void suspend() {
		suspended = true;
	}

	void resume() {
		suspended = false;
	}

	public void run() {
		while(!stopped) {
			if(!suspended) {
				System.out.println(Thread.currentThread().getName());
				try {
					Thread.sleep(1000);
				} catch(InterruptedException e) {}
			}
		}
	}
}
public class Practice {

	public static void main(String[] args) {

		MyThread th1 = new MyThread("*");
		MyThread th2 = new MyThread("**");
		MyThread th3 = new MyThread("***");

		th1.start();
		th2.start();
		th3.start();

		try {
			Thread.sleep(2000);
			th1.suspend(); // 쓰레드 th1을 잠시 중단시킨다.
			Thread.sleep(2000);
			th2.suspend();
			Thread.sleep(3000);
			th1.resume();
			Thread.sleep(3000);
			th1.stop();
			th2.stop();
			Thread.sleep(2000);
			th3.stop();
		} catch (InterruptedException e) {}

	}

}
출처 - 유튜브 남궁성의 정석코딩 [자바의 정석 - 기초편]
'Java > Java의 정석' 카테고리의 다른 글
| 220330 Java - Chapter 14. 람다와 스트림(Lambda & Stream) Part 1 (0) | 2022.03.30 |
|---|---|
| 220329 Java - Chapter 13. 쓰레드(Thread) 남은 부분 (0) | 2022.03.29 |
| 220325 Java - Chapter.12 지네릭스, 열거형, 애너테이션 Part.3 (0) | 2022.03.25 |
| 220324 Java - Chapter 12. 지네릭스, 열거형, 애너테이션 Part.2 (0) | 2022.03.24 |
| 220323 Java - Chapter.12 지네릭스, 열거형, 애너테이션 Part.1 (0) | 2022.03.23 |